python k8s web terminal
通过 python sanic 框架与 python kubernetes-client 实现 k8s 的 web terminal 功能
后端 Python [sanic]
python
@auth_only
async def webssh_pod(request, ws, cloud, env, namespace, podname, container):
    if container == 'default':
        container = None
    stream = K8S(cloud, env).ssh(namespace, podname, container)

    async def read_ws_to_stdin():
        async for data in ws:
            stream.write_stdin(data)

    async def write_stdout_to_ws():
        while stream.is_open():
            stream.update()
            while stream.peek_stdout():
                await ws.send(stream.read_stdout())
            while stream.peek_stderr():
                await ws.send(stream.read_stderr())
            await asyncio.sleep(0.01)  # 极短等待,避免 100% CPU

    try:
        await asyncio.gather(
            read_ws_to_stdin(),
            write_stdout_to_ws()
        )
    except asyncio.CancelledError:
        print("User closed connection")
    finally:
stream.close()python
from kubernetes.stream import stream

class K8S():
    # ...
    def ssh(self, namespace, podname, container=None):
        """登录 pod 终端
        https://github.com/kubernetes-client/python-base/blob/master/stream/ws_client.py
        """
        command = [
            '/bin/sh',
            '-c',
            'TERM=xterm-256color; export TERM; [ -x /bin/bash ] '
            '&& ([ -x /usr/bin/script ] '
            '&& /usr/bin/script -q -c "/bin/bash" /dev/null '
            '|| exec /bin/bash) '
            '|| exec /bin/sh',
        ]
        print(command)
        return stream(
            self.core_api.connect_get_namespaced_pod_exec,
            podname, namespace,
            command=command, container=container,
            stderr=True, stdin=True,
            stdout=True, tty=True,
            _preload_content=False
)python
web.add_websocket_route(
    webssh_pod,
    '/webssh/pod/<cloud>/<env>/<namespace>/<podname>/<container>'
)- python web 端使用
websocket对接 k8s 的 stream 方法 - 并行处理输入输出(异步/事件驱动),用两个任务:一个专门读取 websocket 输入到 Pod,另一个专门从 Pod stdout/stderr 写回 websocket
- 如果你并不是使用的
sanic框架,也可以考虑使用 python websockets 库,sanic 的 websocket 实现用的就是此库
前端 Vue3 [xterm.js]
vue
<template>
  <!-- <el-drawer v-model="show" :extraData="extraData"> -->
  <sc-dialog v-model="show" :extraData="extraData" :close-on-click-modal="false" :close-on-press-escape="false" draggable destroy-on-close>
    <el-select v-model="podname" style="width: 300px; margin-right: 10px; margin-bottom: 5px;" @change="changeTerminal">
      <el-option v-for="item in pods" :key="item" :label="item" :value="item" />
    </el-select>
    <el-select v-model="container" style="margin-bottom: 5px;" @change="changeTerminal">
      <el-option v-for="item in podContainers[podname]" :key="item" :label="item" :value="item" />
    </el-select>
    <div tabindex="-1" id="terminal"></div>
  </sc-dialog>
</template>

<script>
  import config from "@/config"
  import 'xterm/css/xterm.css'
  import { Terminal } from 'xterm'
  import { WebLinksAddon } from '@xterm/addon-web-links'
  import { FitAddon } from '@xterm/addon-fit'
  import { AttachAddon } from '@xterm/addon-attach'
  export default {
    props: {
      modelValue: { type: Boolean, default: false },
      extraData: {type: Object, default: () => {} },
    },
    data() {
      return {
        show: false,
        socket: null,
        term: null,
        podname: null,
        container: 'default',
        pods: [],
        podContainers: {},
      }
    },
    watch:{
      modelValue(){
        this.show = this.modelValue
      },
      async show(val){
        this.$emit("update:modelValue", val)
        if (this.show === true) {
          await this.$nextTick()
          this.openTerminal()
        } else {
          if (this.socket) this.socket.close()
          if (this.term) this.term.dispose()
        }
      },
      extraData() {
        this.podname = this.extraData.podname
        this.pods = Object.keys(this.extraData.pods)
        this.podContainers = this.extraData.pods
        this.container = this.extraData.pods[this.pods[0]][0]
      },
    },
    mounted() {
      this.show = this.modelValue
    },
    created() {
    },
    methods: {
      openTerminal() {
        const term = new Terminal()
        // https://xtermjs.org/docs/api/terminal/interfaces/iterminaloptions/#optional-cursorstyle
        term.options = {
          cursorStyle: 'underline',
          cursorBlink: true,
        }
        const socket = new WebSocket(`${config.WS_URL}/webssh/pod/${this.extraData.cloud}/${this.extraData.env}/${this.extraData.namespace}/${this.podname}/${this.container}`)
        const attachAddon = new AttachAddon(socket)
        const fitAddon = new FitAddon()
        const linkAddon = new WebLinksAddon()
        term.loadAddon(attachAddon)
        term.loadAddon(fitAddon)
        term.loadAddon(linkAddon)

        term.open(document.getElementById('terminal'))

        fitAddon.fit()
        socket.onopen = () => { socket.send('\n') } // 当连接建立时向终端发送一个换行符,不这么做的话最初终端是没有内容的,输入换行符可让终端显示当前用户的工作路径
        term.focus()  // 貌似没有起作用

        window.onresize = function() { // 窗口尺寸变化时,终端尺寸自适应
          fitAddon.fit()
        }

        this.term = term
        this.socket = socket
      },
      changeTerminal() {
        if (this.socket) this.socket.close()
        if (this.term) this.term.dispose()
        this.openTerminal()
      },
    }
  }
</script>

<style scoped>
</style>- 前端直接使用的是 xterm.js 库,它提供了一键对接
WebSocket stream的插件 attach;使用起来非常简单方便,不需要在前端写websocket相关方法 - 上面的代码是我将
web terminal功能单独为一个弹出框组件了,所以看起来代码很多。真正与xterm.js和websocket的代码就几行
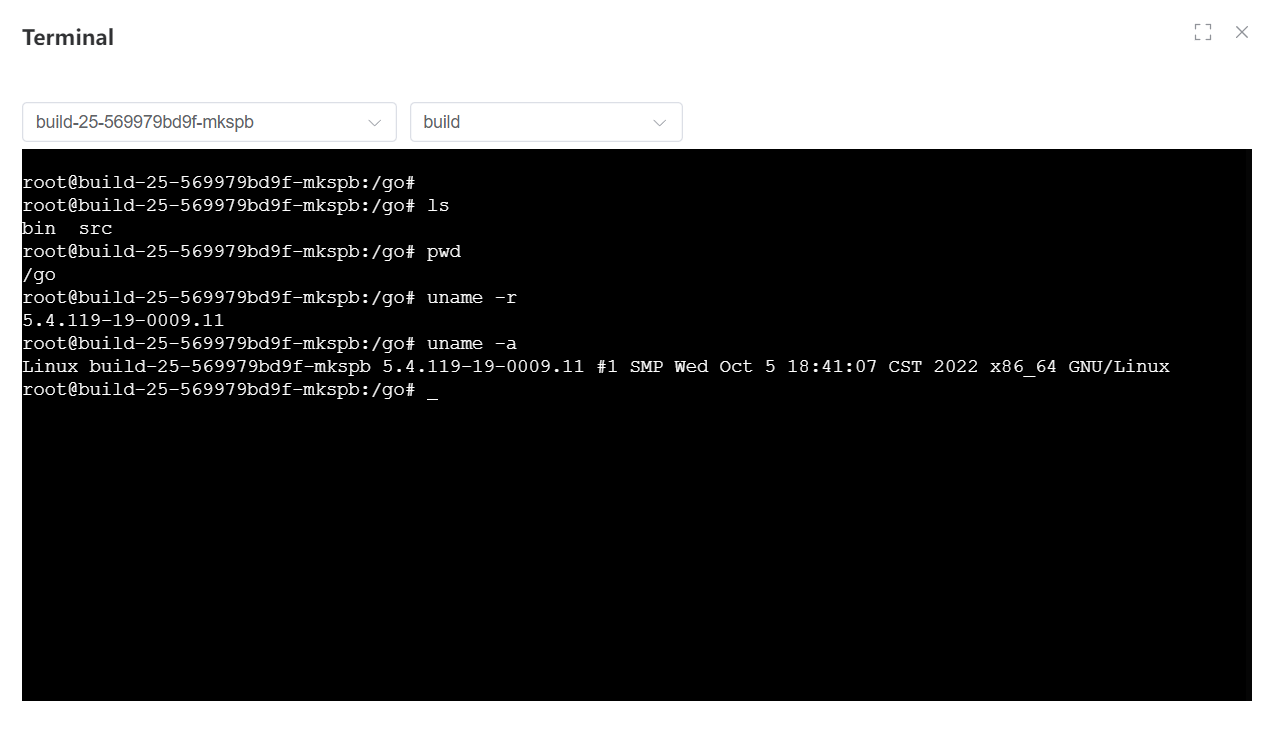
效果图

- 可选择 pod 和相应的容器
